Showing posts with label Hall-Effect Transducers. Show all posts

Hall Effect

The conductivity measurements are not sufficient for the determination of the number of conducting charge and their mobility. Moreover these measurements do not give any information about the sign of the prominent charge carrier.  The Hall Effect supplies the information of the sign of charge carrier.
    When a magnetic field is applied perpendicular to a conductor carrying current, a voltage is developed across the specimen in the direction perpendicular to both the current and magnetic field.  This phenomenon is known as Hall Effect.

    Consider that an external electric field is applied along the axis of specimen, and then the electrons will drift in opposite direction. When a magnetic field is applied perpendicular to the axis of the specimen, the electrons will tend to be deflected to one side. Of course, the electrons will not drift into space but a surface charge is developed.  The surface charge then gives rise to a transverse electric field which causes a compensating drift such that the carriers remain in the specimen.  This effect is known as Hall Effect. 
The Hall Effect is thus observed when a magnetic field is applied at right angle to a conductor carrying a current.

    Consider a slab of material subjected to an external electric field Ex along the x-direction and a magnetic field Hz along the z-direction as shown in Fig. 13.  Due to the electric field a current density Ix will flow in the direction of Ex.  Let us consider the case in which the current is carried by electrons of charge -e.  Under the influence of the magnetic field, the electron will be subjected to a Lorentz force such that the upper surface collects a positive charge while the lower surface a negative charge.


The accumulation of charge on the surface of the specimen continues until the force on moving charges due to the electric field associated with it is large enough to cancel the force exerted by the magnetic field.

    Ultimately a stationary state is reached when the current along y-axis vanishes, a field Ey is set up.  If the charges carriers are holes then the case will be reversed, i.e., the upper surface would become negative while the lower surface as positive.  Thus by measuring the Hall voltage in y - direction, the information about the sign of charges may be obtained.  In this way, the measurement of Hall voltage gives the information about the charge carriers.

Hall voltage and Hall Co-efficient


Importance of Hall Effect


1.   The sign of the current carrying charges is determined.

2.  From the magnitude of Hall coefficient the number of charge carriers per unit volume can be calculated.

3.  The mobility is measured

4. It can be used to decide whether a material is metal, semi conductor or insulator.

   
 Here we should remember that not all the metals have negative Hall constant but some metals have a positive hall constant. (i.e., charge carriers are holes) and if both holes and electrons contribute to conductivity then RHall can be positive or negative depending upon the relative densities and mobilities of the carriers.

Physical Transducers


The most direct application of an optical fiber to measure physical measurands is the microbend transducer, as shown in Fig. 5.44.102,103,105 fiber is deformed by a measurand such as displacement, strain, pressure, force, acceleration, or temperature. In each case, the transduction mechanism is the decrease in light intensity of the beam through the fiber core as a result of the deformation, which causes the core modes to lose energy to the cladding modes. A photodetector is used to provide a corresponding electrical output. This is an intrinsic-type transducer.

Figure 5.45 shows a pressure transducer and a temperature transducer


Fig 5.45 Fiber-optic temperature and pressure transducers.


configured as a Fabry-Perot etalon or interferometer. The spacing between mirrors is critical to the operation of the etalon as a physical transducer.

Any change in that spacing, brought about by a measurand, will cause the transmittance of the etalon to change in proportion to the measurand. These extrinsic transducers are small in size and can be constructed by using integrated circuit techniques.

Optical fibers are also used to measure magnetic and acoustic fields. In a magnetic field transducer as shown in Fig. 5.46, the transduction mechanism consists of the longitudinal strain in the magnetostrictive material caused by the magnetic field and a corresponding strain in the core.

This strain modulates the refractive index of the core and produces a field-dependent phase shift in the output optical beam. An acoustic field transducer can also be made along these lines by replacing the magnetostrictive substrate with an acoustically sensitive coating around the fiber cladding. Consequently, this produces an acoustic field-dependent phase shift of the optical beam.


Fig 5.46 Fiber-optic magnetic field transducer.

A Mach-Zhender interferometer is used to obtain an electrical output proportional to the measurands.

Fiber-Optic Transducers


The role of optical fibers in telecommunication systems is now well established.

The recognition of their role in transducers, about two decades ago, led to an explosive number of applications in physical, chemical, and biochemical transducers.101–103 These transducers can be separated into extrinsic and intrinsic types. In extrinsic fiber-optic transducers, the transduction process takes place external to the fiber and the fiber itself plays a passive role as a light conduit.

In intrinsic transducers, however, the transduction process takes place within the optical fiber. The measurand modulates a parameter of the fiber, such as the refractive index, and the fiber in turn modulates the light beam propagating through its core.


Fig 5.43 Total internal reflection in optical fibers.


The optical fiber used in these transducers is of the cladded-core type used in communication links, as shown schematically in Fig. 5.43. The core is made of silica glass, and surrounding the core is a concentric silica cladding.

The light beam in an optical fiber propagates mainly in the core by total internal reflection (TIR), as shown in Fig. 5.43. A light ray, striking the core-cladding interface at S, is partly reflected (A’) and partly refracted (A”) into the cladding.

By Snell’slaw,


A ray from a laser diode propagating through an external medium of refractive index next and striking the fiber end at an angle _ext has to satisfy Snell’s law at that interface, and maintain TIR at the core-cladding interface. Consequently,


Acousto-Optic Deflection Transducers


The acousto-optic (AO) deflection transducer, aside from other applications is used to detect physical vibrations by converting them into a corresponding phase-modulated electronic signal. The primary mechanism is the interaction of an optical wave (photons) with an acoustic wave (phonons), to produce a new optical wave (photons).

Fig 5.41 Acoustooptic deflection transducer.

Figure 5.41a shows diagrammatically an acoustooptic interaction cell, also known as the Bragg cell. It consists of a solid piece of optical-quality flint glass which acts as the interaction medium. It has optical windows on two opposite sides which serve as ports for the entry and exit of the optical beam.

A high-frequency ultrasound transducer is bonded to one of the two remaining sides. The ultrasound transducer launches longitudinal waves in the interaction region and produces regions of compression and rarefaction, which are regions of varying refractive index. These regions are equivalent to a three-dimensional diffraction grating.

An optical (laser) beam entering the Bragg cell at an angle ө and passing through the length L of the grating experiences the periodic changes in the refractive index at the excitation frequency ώm of the ultrasonic transducer.

Consequently, the optical beam leaving the cell is phase-modulated and consists of an optical carrier at ώc and pairs of optical sidebands around ώc, at ώc, ±N_m, where N is an integer corresponding to the order of the sidebands.There is a unique value of ө= өB corresponding to the optical wavelength λ and the acoustic wavelength , when only one of the first-order sidebands grows by constructive interference and the other, along with all the higher sidebands, diminishes owing to destructive interference.

This is known as the Bragg effect, and өB is called the Bragg angle. The angle is given by the Bragg diffraction equation


where m is the ultrasound velocity in the medium and fm is the ultrasonic modulation frequency of the _n wave. The angle between the Bragg deflected beam and the carrier is 2B.


Fig 5.42 Noncontact vibration-measuring setup using a Bragg cell.

Figure 5.42 shows an application where the Bragg cell is used as a noncontact vibration-measuring transducer.98 A He-Ne laser is used as the source of the optical beam. The Bragg cell is used to measure the surface vibrations. On the face of the photodiode, the demodulation of the optical signals takes place.

The output current of the photodiode has a component at (2_m+_). The VHF receiver measures the sideband amplitude, which is proportional to the amplitude of the surface vibrations.

Photoelectric Detectors


Photoelectric or photoemissive detectors operate on the photoelectric effect, which is a process in which electrons are liberated from a material surface after absorbing energy from a photon. All the energy from a photon is transferred to a single electron in a metal, and that electron, having acquired the energy in excess of Ew, will emerge from the metal surface with a kinetic energy given by

Einstein’s photoelectric equation


where v is the velocity of the emerging electron, m is the mass of an electron, and Ew is the work function. Ew is the energy required by an electron at the Fermi level to leave the metal surface with the highest kinetic energy.

A photoemissive detector is the basic component of vacuum or gas phototubes and photomultiplier tubes. A phototube consists of a semicircular photoemissive cathode concentric with a central rodlike anode in a special glass enclosure. The incoming photons impinge on the photocathode and generate photoelectrons which leave the cathode surface, and because of the electric field between the anode and cathode, these electrons are collected by the anode. This results in an anode current that is proportional to the number of photons impinging on the cathode.

The photomultiplier tube (PMT) operates on the same basic transduction mechanism as the phototube, but the PMT has provisions for realizing high current gain by current multiplication. The components of the PMT are shown schematically in Fig. 5.37. 

Figure 5.37 Photomultiplier tube.

Photoelectrons are generated as in a phototube. These photoelectrons are focused onto the first element of the PMT chain, known as a dynode.

The photoelectrons from the first dynode are directed in succession to other dynodes, which are at progressively higher potential. The electrons accelerate toward these dynodes, and on striking them, they generate many more electrons by a process known as secondary emission. As an example, if there are 10 stages and if each primary electron produced 4 secondary electrons, then the total number of electrons at the end of the dynode chain would be 410 or approximately 106 electrons. 

The electrons from the last dynode stage are collected by the anode.The resulting amplified current is proportional to the number of input photons.

Photonic Transducers


Photonic transducers measure the light intensity by measuring the impulses of finite energy content, generally known as light quanta or photons. In these transducers, the energy of the photons is converted into a proportional electrical output by means of several transduction mechanisms. In this section, in addition to others, we consider the following:

Photoemissive detectors, where the energy of a photon removes an electron from a metal surface placed in a vacuum or a gas-filled environment.

Photoconductive detectors, where the input photons energy creates electronhole pairs which change the conductivity or resistance of a semiconductor by increasing the number of available charge carriers.

Photovoltaic detectors, p-n junction devices where the input photons also generate electron-hole pairs. The electrons and holes provide additional mechanisms for current conduction. These detectors can be operated in the photovoltaic mode or the photoconductive mode.

The energy of a photon, when expressed in electron volts, is given by


Cold-Cathode Vacuum Gage


In this gage, the electrons are generated by a large electric field instead of a hot cathode. The gage consists of two plate cathodes made from zirconium or thorium.

In the space between these cathodes is placed a ring-shaped anode. A magnet provides a magnetic field normal to the plane of the cathode plates, as shown diagrammatically in Fig. 5.36. It is also known as the Penning or Philips gage.

Fig 5.36 Cold-cathode vacuum gage.


A high voltage is applied between the anode and the cathodes, producing electrons that leave the cold cathode surface. These electrons, in the presence of the magnetic field B, travel in spiral paths toward the positively biased ring anode. Only a few electrons are captured by the anode, but the rest make several passes through the ring anode, and in the process ionize the gas. 

The positiveions collected by the negatively biased cathodes produce the usual ion current proportional to the gas pressure. The effective range of this gage is 1×10⁻⁸ to 2×10⁻² torr.

Hot-Cathode Vacuum Gage


The triode or thermionic emission ionization transducer is a hot-cathode vacuum gage. The top cross-sectional view is shown diagrammatically in Fig. 5.35.  

Fig5.35 Hot-cathode vacuum gage.


It consists of a tungsten filament and cathode in the center. Concentric with the cathode is the grid, which is made from a fine nickel wire helix, held in position by upright supports. Surrounding the grid is the external nickel plate electrode, which is concentric with the grid. The gage is housed in an enclosure with an opening that is connected to the chamber whose pressure is being measured.

In this configuration, the electrons are accelerated from the cathode to the grid (+180 V), but most electrons not collected by the fine helix move toward the plate (-20 V). As they move in the vicinity of the plate, the electrons get repelled by the negative potential of the plate.

These electrons undergo several oscillations between the grid and the plate, and during this process they collide with the gas molecules, creating positive ions. The ions are attracted toward the negatively biased plate collector, and an ion current flows in the plate circuit.

This ion current, within a certain pressure range, is proportional to the total pressure (vacuum) in the chamber. The effective range for the gage is 10-8 to 10–3 torr.

The Bayard Alpert vacuum transducer is an example of a hot-cathode ultra-high-vacuum gage. The collector is in the center and consists of a fine nickel wire. The filament and cathode located outside the grid. Its operation is similar to that of the triode gage.

The ion current is proportional to the gas pressure down to 10-10 torr, because the undesired x-rays generated by the grid are minimally intercepted by the wire collector. Its operating range is from 4×10⁻¹⁰ to 5×10⁻² torr. To measure pressures lower than torr, the glass envelope is not used. The operating range of the nude gage is 2× 10–11 to 1×10⁻³ torr.

Ionization Transducers


Ionization transducers (vacuum gages) are used to measure low pressures (vacuum levels) below atmospheric pressure (760 torr). The basic transduction mechanism in these gages is the generation of positive ions from the gas molecules that are present in the chambers to be evacuated. The ions are generated as a result of collisions between the gas molecules and the high-energy electrons that are generated specifically for that purpose. The resulting ion current is proportional to the gas pressure in the chamber.


IC Temperature Transducers


The IC temperature (ICT) transducer is a two-terminal monolithic integrated circuit whose output is a current or a voltage that is directly proportional to temperature T/K. The transduction mechanism utilized in this transducer is the dependence of the base-emitter voltage Vbe of a silicon transistor, on the ambient temperature T/K.

Fig 5.34 Integrated-circuit temperature transducer.

If two well-matched IC transistors are connected as shown in Fig. 5.34a, then the difference between the Vbe’s82 of the transistors Q1 and Q2 is proportional to T, if the ratio of the respective emitter areas O is constant. It is made constant by designing the emitter areas of Q1 and Q2 to be in a fixed ratio and operating them at equal collector currents.

When the temperature being monitored changes, the collector currents of Q1 and Q2 also change. The control circuit as drawn in Fig. 5.34a82,83 forces the collector currents to equalize, and V0 is then proportional to the temperature being measured. The total output current IOUT through Q1 and Q2 is


IOUT is then proportional to T/K if R0 is constant. In practice, R0 has a very small temperature coefficient of resistance. In Fig. 5.34b, the transducer is connected in series with R1 and R2 to produce a voltage drop proportional to T/K. The ICT transducer operates in the range -55 to +150°C with very good linearity.

Crystalline Quartz Thermometers


A quartz crystal, when coupled to conventional oscillator circuitry by replacing its resonant tank circuit, results in an oscillator whose frequency is controlled by the crystal as shown schematically in Fig. 5.33. The precise control depends on the crystal geometry and orientation with respect to the crystallographic axis referred to as a cut. The AT cut, for example, is used in very stable frequency oscillators.

In a quartz thermometer, the transduction mechanism consists of the changes in the elastic and piezoelectric properties of the crystal as a function of temperature.

These changes result in corresponding changes of the oscillator frequency. The frequency of an oscillator can be represented by a third-order polynomial in temperature t80 and is expressed with reference to 25°C, as shown below.


where A, B, C are the temperature coefficients of frequency, f25 is the oscillator frequency at 25°C, and t is the temperature to be sensed. Hammond discovered a crystal cut where A was large and B, C were simultaneously zero, designated as the linear coefficient (LC) cut. This cut is used as a transduction element in quartz thermometers. Figure 5.33 shows an oscillator using the LC cut.


Fig 5.33 Crystalline quartz thermometer.
Its output is a voltage whose frequency changes linearly with temperature. The outputs from the two oscillators are mixed, and the output of the mixer is a much lower frequency but retains the linear relationship between frequency and temperature. The quartz thermometer measures temperatures in the range -80 to 250°C with an accuracy of ±0.075°C. The sensitivity is 1000 Hz/°C and the corresponding resolution is 0.0001°C.


Thermocouple Vacuum Gages


A thermocouple gage is used for monitoring pressures below atmospheric pressure (vacuum) in the range from 2 to 10–3 torr. A gage consists of a filament heated by a constant-current source and a thermocouple attached to it to monitor its temperature. The filament and the thermocouple are housed in an enclosure with an opening connected to the vacuum chamber whose gas pressure is to be measured. A schematic diagram of the TC gage is shown in Fig. 5.32.

Fig5.32 Thermocouple vacuum gauge.


The basic transduction mechanism can be described as the loss of heat caused when the surrounding gas molecules impinge on the heated filament and take heat away from it, resulting in a decrease in its temperature.79 As the pressure decreases, a smaller number of molecules impinge on the filament, and consequently its temperature rises. This rise in temperature is indicated by the electrical output of the thermocouple and is proportional to the pressure (vacuum). In order to improve the lower limit of 10–3 torr, several TCs are connected in series as is done in a thermopile.

The Pirani gage also operates on the same basic transduction mechanism. The changes in temperature of its tungsten filament are measured as changes in its resistance with a Wheatstone bridge. The out-of-balance voltage is proportional to the vacuum level. The range of the Pirani gage is around 10–3 to 100 torr.86 The Convectron is a Pirani gage with improvements in its accuracy, repeatability, and response time. The upper limit extends to 1000 torr.

Thermocouples


When two dissimilar metal wires are joined at the ends and are kept at different temperature TR and TS, a continuous thermoelectric current flows owing to the Seebeck effect as shown in Fig. 5.31a. If the wires are cut, an open-circuit Seebeck voltage is measured which is proportional to the temperature difference.

If TR is constant, the Seeback voltage is proportional to Ts. The associated Peltier effect is the increase or decrease of the junction temperature when an external current flows in the thermocouple (TC) wires. Reference 77 gives a description of these effects and their interrelationships.

Figure 5.31 Thermocouples. (a) Seebeck effect. (b) Measurement setup for remote sensing.
Figure 5.31b shows an arrangement when the measuring equipment is remote from the sensing TC. Matched extension TC wires are used and the reference junctions are formed at the measuring equipment. The reference junctions must be kept at a constant temperature, mostly at ambient room temperature TA.

This requirement can also be satisfied by electronically providing a reference voltage compensation.

Thermocouples used in industry are made from several combinations of metals.


Table  summarizes the properties of TCs that are commonly used, and a complete set of thermocouple reference tables is given in Ref. 76. The basic measuring instrument used with these thermocouples is the potentiometer, but direct-reading, analog, and digital meters of many kinds are also available from manufacturers.

Thermodynamic Transducers


In thermodynamic systems, heat flows from one system to another whenever there is a temperature difference between them. Heat flow takes place by heat conduction, heat convection, and thermal radiation.

The calibration of platinum resistance thermometers, thermocouples, and the measurement of heat flow require the precise determination of temperature.

In 1989, the International Committee on Weights and Measures adopted the International Temperature Scale of 1990 (ITS-90). The unit of the fundamental physical quantity known as thermodynamic temperature, symbol T90, is the kelvin, symbol K. The relationship between the International Celsius Temperature, symbol t90, and T90 is t90=T90/K-273.15. ITS-90 also defines specific fixed-point temperatures corresponding to various states of substances, like the triple point (TP) temperature of water (0.01°C, or 273.16 kelvins). A complete list of these fixed points is given in Ref. 76. These fixed points are used in the calibration of platinum resistance thermometers and thermocouples by evaluating the coefficients of the polynomials that represent their outputs.

According to ITS-90, a platinum resistance thermometer, in the range from 0°C to the freezing point of aluminum, would be calibrated at the TP of water (0.01°C) and the freezing points of tin (231.928°C), zinc (419.527°C), and aluminum (660.323°C or 933.473 kelvins).

Tunneling Displacement Transducers


In 1986, Binnig and Rohrer were awarded the Nobel Prize in Physics for the scanning tunneling microscope (STM). The physical basis for the surface profiling transducer (SPT) used in the STM is the phenomenon of electron tunneling.

It represents the flow of electrons between two conducting surfaces under the influence of a bias voltage. The resulting tunneling current or the tunneling effect63 is a measure of the separation between these conductors.

Figure 5.29 Transduction mechanism of the tunneling displacement transducer.


Figure 5.29 illustrates the transduction mechanism of the SPT. In practice,

one of the conductors is replaced by an extremely fine tip and the other conductor is the surface to be profiled. When the clouds of electrons surrounding the tip and the sample surface are made to overlap and a bias potential is applied between them, a tunneling current It is established. This current can be represented by


where d is the distance between the tip and the sample surface and S0 is a constant for a given work function. It is an extremely sensitive function of the distance d. In practical terms, when the tunneling current is well established, a change in d equal to one atomic diameter will change It by a factor of 1000.

The SPT utilizes this sensitivity in a STM to profile the surfaces of materials at the atomic level. The scanning can be done in vacuum, liquids, or gases.

The angstrom movements in an STM are achieved with Inchworm* motors and a scanning tube.65,66 The image shown is of atoms on the surface of a silicon substrate.

Based on similar principles, but on a transduction mechanism that involves repulsive forces, an atomic force microscope (AFM) has been developed for surface profiling.

Fig 5.30 Infrared radiation transducer.

The SPT has also been used in an infrared radiation detector68 as shown in Fig. 5.30. The tip can be lowered and raised by means of an electrostatic force between two electroded surfaces of the cantilever. The infrared sensor consists of a gold-coated membrane that traps a small volume of air or helium between itself and the base of the transducer. The radiation that is absorbed by the gold coating causes the gas to expand and deflect the membrane. The deflection, which is measured by the SPT, is a measure of the infrared radiation.

Physical Transducers.


In transducers used for force, acceleration, and temperature measurements, the length L is modified by the measurands. In crystalline quartz devices, the fractional change in SAW velocity is small compared with the surface strain caused by a change in L.

We can therefore expect a decrease in oscillator frequency when L is increased by direct axial tension or by an increase in temperature.So, in transducers that measure force, the temperature must be maintained constant. Figure 5.27 shows a dual oscillator configuration where the temperature effects are reduced and the force sensitivity is doubled. For a force acting downward, the A1 oscillator increases its frequency and the A2 oscillator decreases its frequency.

Figure 5.27 Dual SAW-oscillator force transducer. (a) Oscillators on opposite faces of quartz substrate achieve temperature compensation. (b) Change in oscillator frequency as a function of the force. Mixer output shows almost double the sensitivity.

The difference in frequency is a measure of the force.


Surface Acoustic Wave (SAW) Transducers


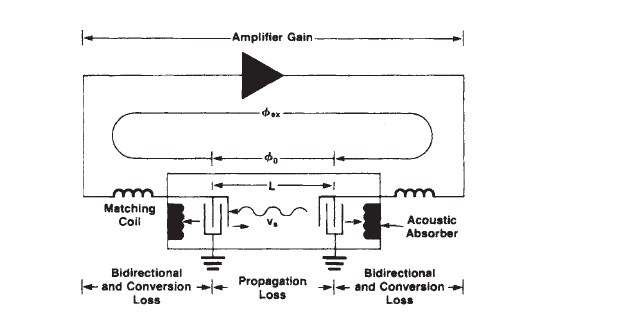
SAW transducers are used to measure physical, chemical, and environmental measurands. These transducers consist of a SAW delay line with two IDTs, inserted in the feedback loop of an amplifier as shown in Fig. 5.26.

Fig 5.26 SAW oscillator.

The SAW, in traveling between the IDTs, undergoes a phase shift _0, and when the total phase shift _T around the loop is 2nand the total attenuation is less than the amplifier loop gain, the circuit goes into oscillation around the center frequency f0 of the IDT, which is given by nVs/L. The total phaseshiftis


Polymer Transducers


In 1969, Kawai69 discovered that polyvinylidene difluoride (PVDF, PVF2), which is an organic ferroelectric polymer, displayed strong piezoelectric properties. In the last decade, an organic copolymer known as polyvinylidene difluoride trifluoroethylene P(VDF-TrFE) with a higher coupling coefficient has become available. These polymers are used in hydrophones, audio microphones, and robotic tactile transducers. In addition, they find application in wave-propagation transducers for NDT, medical imaging, hi-fi stereophones, and tweeters. Table shows the piezoelectric and related properties of these copolymers.


A hydrophone is a very sensitive pressure transducer that is used to map the temporal and spatial acoustic pressure field of another transducer that is propagating acoustic energy through a fluid.

Hydrophones have to satisfy many requirements: low acoustic impedance to optimally match the fluid impedance and cause the least disturbance to the field being measured, small sensing spot size to obtain good spatial resolution, large bandwidth and flat frequency response to respond to harmonics of the measured signal, and good linearity to handle the wide dynamic range of pressures.

Two types of hydrophones most commonly used are the membrane hydrophone and the Lewin-type needle hydrophone.

In the membrane hydrophone, a metallized 250- to 500-μm-diameter circular dot is vacuum-deposited on either side of a poled copolymer film using a simple mask. This results in a single-element dot transducer. Suitable connections are made to the dots by vacuum-deposited metallic traces. The copolymer is then stretched and held in position over a circular hoop. The pressure of the acoustic field is measured as the electrical output of the dot transducer.

The needle hydrophone consists of a poled, 0.5- to 1.0-mm-diameter, PVDF or copolymer film transducer which is bonded to the flattened end of a hypodermic needle but electrically insulated from it. The electrical output of the transducer gives a measure of the acoustic field pressure.

Doppler Effect Transducers


When a sound wave at a given frequency is reflected from a moving target, the frequency of the reflected or backscattered sound is different. The shift in frequency is caused by the Doppler effect. The frequency is up-shifted if the target is moving toward the observer and down-shifted if it’s moving away. The Doppler shift in frequency is proportional to the velocity of the moving target and is given by 


Two techniques are used in the measurement of fluid flow velocity by the Doppler technique. The continuous-wave (CW) method, as used to determine the flow velocity of slurries in a pipe, is illustrated by Fig. 5.25a.52 The transmitted CW

Figure 5.25 Measurement of velocity by Doppler shift. (a) Continuous-wave (CW) method. (b) Pulse-wave (PW) method gives the peak velocity.

signal is partly reflected by the suspended particles or gas bubbles in the slurry. This backscattered signal is received by a second transducer and its output is compared with the transmitted signal. The Doppler shifted signal fD is given by Eq. 5.21. Knowing _ and f0, the velocity V can be obtained.

The second method, as used in a medical diagnostic application, is illustrated by Fig. 5.25b. A pulsed-wave (PW) signal is used to measure the blood flow velocity in a small blood sample volume or range cell localized in the bloodstream of a coronary artery. The device is constructed from a 0.45-mm-diameter, flexible and steerable guide wire with a 12-MHz transducer integrated into its tip.

The transducer transmits a sequence of 0.83-μs-duration pulses at a pulse repetition frequency of 40 kHz into the bloodstream. The range cell is located by time (range) gating the Doppler shifted backscattered signal generated by the red blood cells and received by the same transducer. This signal is compared with the transmitted signal, where as before the velocity V can be calculated using Eq. 5.21. In this case, cos ө=1.

Angle-Beam Transducers


Angle-beam transducers are used in nondestructive evaluation of castings and riveted steel connections and in the inspection of welded structural elements by the pulse-echo technique. This technique requires the ultrasonic beam to travel at a small angle to the surface of the structure Angle-beam transducers are based on the principle that a longitudinal wave incident on a solid 1-solid 2 interface is mode converted into a refracted shear wave and a refracted longitudinal wave, propagating in solid 2 as shown in Fig. 5.24. 

Fig 5.24 Angle-beam transducer.


The directions of the refracted waves are dictated by Snell’s law.These waves are used to selectively investigate welded joints,cracks, and other structural faults. According to Snell’s law, as _L1 is increased, _L2 and _S2 also increase. Corresponding to _L1 (crit.), _L2 becomes 90° and VL2 ceases to exist, and only VS2 propagates in solid 2. If _L1 is increased much beyond _L1 (crit.), VS2 also disappears. In this situation a SAW propagates on the surface of solid 2. SAWs are used in NDT to detect surface cracks.


Labels

PROJECTS 8086 PIN CONFIGURATION 80X86 PROCESSORS TRANSDUCERS 8086 – ARCHITECTURE Hall-Effect Transducers INTEL 8085 OPTICAL MATERIALS BIPOLAR TRANSISTORS INTEL 8255 Optoelectronic Devices Thermistors thevenin's theorem MAXIMUM MODE CONFIGURATION OF 8086 SYSTEM ASSEMBLY LANGUAGE PROGRAMME OF 80X86 PROCESSORS POWER PLANT ENGINEERING PRIME MOVERS 8279 with 8085 MINIMUM MODE CONFIGURATION OF 8086 SYSTEM MISCELLANEOUS DEVICES MODERN ENGINEERING MATERIALS 8085 Processor- Q and A-1 BASIC CONCEPTS OF FLUID MECHANICS OSCILLATORS 8085 Processor- Q and A-2 Features of 8086 PUMPS AND TURBINES 8031/8051 MICROCONTROLLER Chemfet Transducers DIODES FIRST LAW OF THERMODYNAMICS METHOD OF STATEMENTS 8279 with 8086 HIGH VOLTAGE ENGINEERING OVERVOLATGES AND INSULATION COORDINATION Thermocouples 8251A to 8086 ARCHITECTURE OF 8031/8051 Angle-Beam Transducers DATA TRANSFER INSTRUCTIONS IN 8051/8031 INSTRUCTION SET FOR 8051/8031 INTEL 8279 KEYBOARD AND DISPLAY INTERFACES USING 8279 LOGICAL INSTRUCTIONS FOR 8051/8031 Photonic Transducers TECHNOLOGICAL TIPS THREE POINT STARTER 8257 with 8085 ARITHMETIC INSTRUCTIONS IN 8051/8031 LIGHTNING PHENOMENA Photoelectric Detectors Physical Strain Gage Transducers 8259 PROCESSOR APPLICATIONS OF HALL EFFECT BRANCHING INSTRUCTIONS FOR 8051/8031 CPU OF 8031/8051 Capacitive Transducers DECODER Electromagnetic Transducer Hall voltage INTEL 8051 MICROCONTROLLER INTEL 8251A Insulation Resistance Test PINS AND SIGNALS OF 8031/8051 Physical Transducers Resistive Transducer STARTERS Thermocouple Vacuum Gages USART-INTEL 8251A APPLICATIONs OF 8085 MICROPROCESSOR CAPACITANCE Data Transfer Instructions In 8086 Processors EARTH FAULT RELAY ELECTRIC MOTORS ELECTRICAL AND ELECTRONIC INSTRUMENTS ELECTRICAL BREAKDOWN IN GASES FIELD EFFECT TRANSISTOR (FET) INTEL 8257 IONIZATION AND DECAY PROCESSES Inductive Transducers Microprocessor and Microcontroller OVER CURRENT RELAY OVER CURRENT RELAY TESTING METHODS PhotoConductive Detectors PhotoVoltaic Detectors Registers Of 8051/8031 Microcontroller Testing Methods ADC INTERFACE AMPLIFIERS APPLICATIONS OF 8259 EARTH ELECTRODE RESISTANCE MEASUREMENT TESTING METHODS EARTH FAULT RELAY TESTING METHODS Electricity Ferrodynamic Wattmeter Fiber-Optic Transducers IC TESTER IC TESTER part-2 INTERRUPTS Intravascular imaging transducer LIGHTNING ARRESTERS MEASUREMENT SYSTEM Mechanical imaging transducers Mesh Current-2 Millman's Theorem NEGATIVE FEEDBACK Norton's Polarity Test Potentiometric transducers Ratio Test SERIAL DATA COMMUNICATION SFR OF 8051/8031 SOLIDS AND LIQUIDS Speed Control System 8085 Stepper Motor Control System Winding Resistance Test 20 MVA 6-digits 6-digits 7-segment LEDs 7-segment A-to-D A/D ADC ADVANTAGES OF CORONA ALTERNATOR BY POTIER & ASA METHOD ANALOG TO DIGITAL CONVERTER AUXILIARY TRANSFORMER AUXILIARY TRANSFORMER TESTING AUXILIARY TRANSFORMER TESTING METHODS Analog Devices A–D BERNOULLI’S PRINCIPLE BUS BAR BUS BAR TESTING Basic measuring circuits Bernoulli's Equation Bit Manipulation Instruction Buchholz relay test CORONA POWER LOSS CURRENT TRANSFORMER CURRENT TRANSFORMER TESTING Contact resistance test Current to voltage converter DAC INTERFACE DESCRIBE MULTIPLY-EXCITED Digital Storage Oscilloscope Display Driver Circuit E PROMER ELPLUS NT-111 EPROM AND STATIC RAM EXCITED MAGNETIC FIELD Electrical Machines II- Exp NO.1 Energy Meters FACTORS AFFECTING CORONA FLIP FLOPS Fluid Dynamics and Bernoulli's Equation Fluorescence Chemical Transducers Foil Strain Gages HALL EFFECT HIGH VOLTAGE ENGG HV test HYSTERESIS MOTOR Hall co-efficient Hall voltage and Hall Co-efficient High Voltage Insulator Coating Hot-wire anemometer How to Read a Capacitor? IC TESTER part-1 INSTRUMENT TRANSFORMERS Importance of Hall Effect Insulation resistance check Insulator Coating Knee point Test LEDs LEDs Display Driver LEDs Display Driver Circuit LM35 LOGIC CONTROLLER LPT LPT PORT LPT PORT EXPANDER LPT PORT LPT PORT EXTENDER Life Gone? MAGNETIC FIELD MAGNETIC FIELD SYSTEMS METHOD OF STATEMENT FOR TRANSFORMER STABILITY TEST METHODS OF REDUCING CORONA EFFECT MULTIPLY-EXCITED MULTIPLY-EXCITED MAGNETIC FIELD SYSTEMS Mesh Current Mesh Current-1 Moving Iron Instruments Multiplexing Network Theorems Node Voltage Method On-No Load And On Load Condition PLC PORT EXTENDER POTIER & ASA METHOD POWER TRANSFORMER POWER TRANSFORMER TESTING POWER TRANSFORMER TESTING METHODS PROGRAMMABLE LOGIC PROGRAMMABLE LOGIC CONTROLLER Parallel Port EXPANDER Paschen's law Piezoelectric Wave-Propagation Transducers Potential Transformer RADIO INTERFERENCE RECTIFIERS REGULATION OF ALTERNATOR REGULATION OF THREE PHASE ALTERNATOR Read a Capacitor SINGLY-EXCITED SOLIDS AND LIQUIDS Classical gas laws Secondary effects Semiconductor strain gages Speaker Driver Strain Gages Streamer theory Superposition Superposition theorem Swinburne’s Test TMOD TRANSFORMER TESTING METHODS Tape Recorder Three-Phase Wattmeter Transformer Tap Changer Transformer Testing Vector group test Virus Activity Voltage Insulator Coating Voltage To Frequency Converter Voltage to current converter What is analog-to-digital conversion Windows work for Nokia capacitor labels excitation current test magnetic balance voltage to frequency converter wiki electronic frequency converter testing voltage with a multimeter 50 hz voltages voltmeter

Search More Posts

Followers