36-bits LEDs Display Driver


36-bits LEDs Display Driver


This device used a very common components. For the driver I used any TTL buffer ICs like 7407 (Open Collector type) or 7417 (OC type). It is also can be used inverter ICs like 7404, 7405 (OC type), 7406 (OC type), 7414 (Schmitt Trigger type), 7416 (OC type), 7419 (Schmitt Trigger type). Any LS type may be ok, I think. If the ICs used an inverter type, all LEDs must be turn over the polarity and all common resistor pack must be connect to positive supply. Resistor R1...R36 may be omitted. Open Collector buffer type needs these resistors to pull up power. Open Collector Inverter type or just an inverter type does not need these pull up resistors. Schmitt Trigger type also does not need these resistor. All of these ICs are pin compatible, so it can be change to the spare ICs you can get. But becareful to the common stripe of resistors pack PCB. I designed these stripe to the ground all (used buffer type IC). If you are using different ICs, the layout need to be changed. Used miniature LEDs with high eficiency emission, so the amperes always keep small. I use a little type so I can sink about 1 mA at each gate by used a 3.9 kOhm resistor. I use resistors pack type, but if  these are difficult to find, its can be change to normal resistor type. The layout must be change also. My prototype used 7417 and 74LS04 type and it runs quiet good.
ViewSonic VX2250WM-LED 22-Inch (21.5-Inch Vis) Widescreen Full HD 1080p LED Monitor with Integrated Stereo Speakers
 Schematic Diagram  

Here is the complete schematic diagram (I drawn it with Protel V1.0)  

click the below image for zooming 


 PCB Layout

First because I intended to put it all in a box, I drawn the PCB in two separate plate, to make it fit in a box by doubling it. The PCB used a single layer side. One for the driver and the other for display. Here is the complete PCB layout (I drawn it with Protel V1.5). 

click the images  for zooming 


.
 Mounting

All the circuit are very best if it can fit in a box. I put it all in a box like below. The layout panel consist of 8-bits LEDs, double 12-bits LEDs, 4-bits LEDs, miniature jack socket, miniature on/off switch, 6-pins connector for 4-bits LEDs, DB-9 female connector for 8-bits LEDs, and DB-25 female connector for double 12-bits LEDs. Its quiet a compact device. 


Components
 
Notes: Resistor R1...R36 refer to the ICs used. see text for any detail info.
  • Resistors:
      1. RP1...RP4 (Resistor Pack)=3k9 x 8............................ 4 pcs
      2. RP5 (Resistor Pack)=3k9 x 4.................................. 1 pce
      3. R1...R36=4k7 (Optional, see text)........................... 36 pcs
  • Diodes:
      1. L1...L32=Miniature LED (Red)................................ 32 pcs
      2. L33...L36=Miniature LED (Yellow)............................. 4 pcs
  • ICs:
      1. Buffer IC1...IC6=7417 (See text)............................. 6 pcs
  • Others:
      1. Con1=Miniature jack socket (mono)............................ 1 pce
      2. Con2=DB-25 female socket..................................... 1 pce
      3. Con3=DB-9 female socket...................................... 1 pce
      4. S1=Miniature on/off switch (spdt)............................ 1 pce
      5. Con4=6-pins male connector................................... 1 pce


 Testing


When this device run for the first time, it should light on for every LEDs, because all the inputs is on the high state condition. I have built the program test for this LEDs, but not for all inputs, by used LPT printer port adapter. The program runs every bits on LPT bits to simulate a sequence. It is a nice display. Please try by your self.


Prototype

Compaq CQ56-219WM Presario Laptop 15.6" LED display / 2.20GHz Celeron Processor / 2GB DDR2 RAM / 250GB HDD / Lightscribe DVD±R/RW / 802.11 b/g/n Wifi / 6 Cell / Windows 7 Home Premium (64-bit)

My prototype not precisely the same as the layout panel above. A little different in terminals and connectors for input bits. The panel made by plastic sheet. Here is the picture. 


 Application

Here is the application program and hardware. The program test on 80486-DX2-66 PC/AT computer.


E PROM ERASER


A. PREFACE


An EPROM can be reprogrammed if we erased the data. How do the erase work ?
EPROM can be erased used an ultraviolet light. Usually EPROM being erased by used a specific ultraviolet lamp. This lamp has a wave-length about 2537 Angstrom or less than 400 nm. Even with sun light or neon light can erased EPROM, it is the reason why an EPROM must cover its quartz crystal window with an opaque label. Research showed that a 2716 type should be erased after 3 years by exposured with neon light continuously. With sun light, it's about one week.
The best way to erased EPROM is by exposure the crystal window with 253.7 nm ultraviolet light and intensity 12 mW/m2. The window has a distance about 2 to 3 cm. The exposure must apply as long as about 10 to 40 minutes (usually 15 to 20 minutes is enough).
What is the philosophy of erased an EPROM ?
The philosophy is that when we erased an EPROM, we make the data stored in it to be logic 1 all. EPROM use a floating-gate avalanche-injection MOS (FAMOS) transistor cell to store charge. Applying a special programming voltage (Vpp) cause a high electric field to be developed in the channel region of the transistor. This is in turn causes electrons to jump the silicon dioxide barrier between the channel region and the floating gate. During programming the select gate is given a positive bias which helps attract these electrons to the floating gate electrode. Because the floating gate is surrounded by silicon dioxide, the injected charge is effectively trapped. Cell with trapped charge cause the transistor to be biased on, where as those cells without trapped charge are biased off. Blank EPROMs have no trapped charge and each cell store a logic 1. The electrons on the floating gate absorb photons from the ultraviolet light source and acquire enough energy to reverse the programming process and return to the substrate.

Pursuit of Dignity 


B. ERASER  

 There are many type of EPROM eraser sold in the market, but the price is too high. If we want to do some work, we can build an EPROM eraser with a low cost. Here it is.
To get an ultraviolet lamp, we can used a specific lamp from philips, i.e.: TUV 6 W. this lamp has a wave-length that match for our purpose. This lamp usually used for sterilization medical devices. May be this type quiet hard to find. Another type is Germicidal lamp. This is also for sterilize. I have used this one and seems to work good.
Prom Nights from Hell 
More about Germicidal lamp please visit Sci.Electronics FAQ: Cheap EPROM Eraser
Last search about Germicidal lamp, I got a catalog info at my office from 'EYE' maker, one of the largest lamp maker. Here if you want to see it.


Note that neon lamp type usually used for aquarium accessory can not be used, because the wave-length is not match.
The lamp is about 5 to 10 W. Almost the same as the general neon lamp. The glass is clear, and the fillament can be seen directly. The length about 15 to 25 cm depends on the rating. Used a 10 W / 220 V ballast coil and a starter. Figure I-1. shows the schematic diagram for this lamp connection (the same like conventional neon lamp). Except this kind of circuit, many electronically ballast sell on the market can be used too!
New BOSCH Evaluation/Shuttle Board For Digital Pressure Sensor BMP085 Temperature Measurement 
'Electrolux' product sell this ultraviolet kind of lamp, for their water purifier product part. This can be used also.

Warning!!! Be careful when apply circuit to main line, allways check and recheck the circuit before connecting it in the first time, and also keep in mind that do not see the lamp light directly because ultraviolet light can make you blind !


Fig I-1. Neon lamp wiring schematic.

  • Part list for the eraser circuit :
    1. Neon ballast coil, 10W/220V.......................................................... 1 pce
    2. Neon Starter, 10 - 65W................................................................. 1 pce
    3. Germicidal lamp, type: G8T5, GL-8, 8W........................................... 1 pce
    4. Neon fitting................................................................................. 2 pcs
    5. Electrical switch, 2A/220V.............................................................. 1 pce
    6. Main outlet plug connector, 2A/220V............................................... 1 pce

C. TIMING CIRCUIT  

The erasing time of an EPROM variate about 10 to 40 minutes. It is a pity to waste our time to waiting it while watch the clock round until the EPROM has to be erased. Here a circuit to get the perfect time while it is erased, we can do some another work and let the eraser work by it self. Figure I-2. shows this timer circuit diagram.


Fig.I-2. Timer circuit diagram.

  • Part list for the timer circuit :
    • Resistors :
    1. R1=10 kOhm ............................................................................ 1 pce
    2. R2=180 kOhm .......................................................................... 1 pce
    3. R3, R4, R6=56 kOhm ................................................................. 3 pcs
    4. R5=100 kOhm .......................................................................... 1 pce
    5. R7, R8=1 kOhm ........................................................................ 2 pcs
    6. R9=470 Ohm ............................................................................ 1 pce
    7. Variable P1=50 kOhm ................................................................ 1 pce
    • Capasitors :
    1. C1=470 uF/16V (electrolith) ...................................................... 1 pce
    2. C2=100 nF (ceramic) ................................................................ 1 pce
    3. C3=10 uF/10V (electrolith) ........................................................ 1 pce
    4. C4=330 nF (ceramic) ................................................................ 1 pce
    5. C5=1 uF (non polar) ................................................................. 1 pce
    • Diodes :
    1. D1=1N 4001 ............................................................................ 1 pce
    2. D2=Red LED ............................................................................ 1 pce
    3. D3=Yellow LED ........................................................................ 1 pce
    4. D4=1N 4148 ............................................................................ 1 pce
    5. Bridge BD=1N 4001 .................................................................. 4 pcs
    • Semiconductors :
    1. Transistor T1, T3=BC 557 ......................................................... 2 pcs
    2. Transistor T2=BC 160 ............................................................... 1 pce
    3. IC1=7805 ............................................................................... 1 pce
    4. IC2=4060 ............................................................................... 1 pce
    • Others :
    1. Transformer Tr1=500mA/6V sec, 220V pri ................................... 1 pce
    2. Relay Re1=5V/100mA or 6V/100mA ........................................... 1 pce
    3. Push on switch S1 ................................................................... 1 pce
    4. Microswitch S2 .........................................................................1 pce
    5. Selector switch 1P3T (rotary) S3 ................................................ 1 pce

D. CONSTRUCTION

Because the lamp must not be seen directly when on, so we must make the box fully closed. Figure I-3. shows an example of the construction box. The dimension depends on the lamp size.


Fig. I-3. EPROM eraser box construction.

More attention to mounting the microswitch in the cover box. It must be on when the cover is fully closed or the circuit is never work Also it is not right if the microswitch has to be on when the cover not fully closed yet. Set the distance between the ICs and lamp about 2 to 3 cm length. You can add some hole in the bottom of box for ventilation, because when the lamp is on, the temperature inside may be rised. This was not showed in the figure, but I had added it in my prototype. There is some gap between the styroform and the bottom of box. So, you can make this hole. Use small hinges to open or close the cover. The box divide by two section. The back section is to mounting the timer PCB, ballast coil and lamp starter. Also some panel in the top of box for push button set/reset, power indicator lamp, and the selector switch to choose the right time to exposure the EPROM.
 

E PROM PROGRAMMER


There are many EPROM Programmers sell in the market. Generally those devices have the ability to programmed many type of ICs. But unfortunately, the value is still very high for the home constructor and hobbies. Even if we only want to program a simple type of EPROM IC. The circuit here is the implementation of the 2764 type EPROM programmer. I expand it from the article made by Moh. Ibnu Malik (see the reference below). It is a quiet simple one and the most important thing that it is a low cost value. The only one condition must be fill is the requirement of a computer. Because this device use an LPT printer parallel port adapter as the connection. The function is only for writing the EPROM and can not be used to read data from EPROM, because we want to maintained the simplicity of the circuit by itself. Add more function will add the complexity of the circuit. It doesn't seem that this function can't be add to the LPT port, as we may know that this port only for sending data. But in now a days many devices can be attach to this port, like : scanner, storage media (zip drive, tape cartridge, even hard disk, etc.), etc. This devices can receive data from parallel port. Secondly, many of LPT parallel port products in recent years can be programmed as multi I/O (have the capability to read and write or bi-directional). So it is all our decision to make what kind of device that we want to connect to.
Can we make it, so it can be read the EPROM data too?

Exploring C++: The Programmer's Introduction to C++ 
In the original design, the hardware only have the write capability. But I had added the option for read data. As long as we have the bi-directional LPT port adapter, this feature can be added to our card. But this option only valid for the new LPT card (see how to checked this feature at LPT parallel port adapter topic). For the old card, it must be configured first, needs a little hardware modification (see change an old LPT card). But I think, many of these ports are uni-directional ports For this port, we can't read from outside, without add more hardware. If we used PC port for writing and PS or DP ports for reading, we can used it to read/write the EPROM (more details of the hardware can be seen at LPT parallel port extender topic). By used this optional card, our EPROM programmer can be run on uni-directional LPT port adapter or standard LPT port adapter, used the same program to run.
2764 type EPROM is a 8192 byte erasable and electrically programmable ROM. This device is packaged in a 28 pin Dual In Line Package (DIL/DIP) with transparent lid. The transparent lid on the package allows the memory content to be erased with ultraviolet light (more discussion about it, go to EPROM eraser topic). 2764 type EPROM usually have the programming voltage about 21V or 25V (in the old fabricate) and 12.5V (in the new fabricate). The new one is coded an A like : 2764-A in the package. This is an Intel product. We choose the new one voltage to implementation. The complete operation mode selection is like below :


Operation Mode Selection
Pins
Mode


CE (active Lo) (20)


OE (active Lo) (22)


PGM (active Lo) (27)


Vpp (1)


Vcc (28)


Outputs (11~13,15~19)


Read


VIL


VIL


VIH


Vcc


Vcc


D out


Stand-by


VIH


X


X


Vcc


Vcc


High Z


Program


VIL


X


VIL


Vpp


Vcc


D in
Verify


VIL


VIL


VIH


Vpp


Vcc


D out


Inhibit


VIH


X


X


Vpp


Vcc


High Z
Note : X = don't care

This circuit use 8 bits of data line (DP) and 4 bits of control line (PC) and 3 bits of status line (PS) as bits for identifying of our card and for mode operation detection. PC bit 0 (stobe/inverting output) is used for PGM pulse, to program the EPROM. PC bit 1 (autofeed/inverting output) is used for resetting the address counter. We used a CMOS 4040 binary counter to increment the EPROM addresses. PC bit 2 (init/normal output) is used for A12 address because the binary counter only for 12 stages. PC bit 3 (select in/inverting output) is used for increment pulse for the address counter. PS bit 3 (error/normal input) and PS bit 7 (busy/inverting input) are used for identify card. If this bit Lo and Hi meaning that the EPROM programmer card is connected. You can choose another bits or the combination of it if you want. PS bit 4 (select/normal) used for detection the manually selector switch. If this bit lo, it means read operation mode choose. All of this only valid for bi-directional port. For standard port, only PS bit 3 be checked, and the detection of mode operation can not be performed because we have run out all input function. I drawn this circuit with protel ver 1.0 and the PCB layout with protel ver 1.5

A Programmer's Introduction to C#, Second Edition 
First, I implemented the software in Turbo Pascal. The programming stage was perform by given the PGM pin lo during 50 milli seconds (see the characteristics data for Standard EPROM Programming Algorithm). Beside that there is one more programming algorithm (see the characteristics data for Intelligent EPROM Programming Algorithm), but I didn't implemented here (I am still working on a complex EPROM programmer project, that cover all of EPROM type from 2716 up to 27512 type). An implementation of this algorithm can be obtained from Andrew's eprommer project. Thanks to Tom Johansen for this link page. The difficulty is how to get the exactly 50 milli seconds delay time in Pascal? Using the DELAY(N) statement in pascal can solve the problem, but only for one type of computer, not for the other type (I mean for any range of PC type;PC, PC/XT, AT, 286, 386, 486 or even a pentium). I create a subroutine object in assembly language to link in pascal, it doesn't work, but it works in pure assembly. So I make a starting program run in assembler and call a child program to execute in pascal. The program seems to work good. The algorythm that I used is like this : To get a 50 milli seconds delay time, I reprogramming the PIT channel 0 in PC to active at 1 milli second delay time (standard delay time is 54.945 milli seconds, i.e. 18.2 clock ticks/second). This timer is used for INT 08H hard ware interrupt to generate a clock tick and used by disk drive delay time. This also used by INT 1CH (for user interrupt). So we must make the subroutine in order not to mixed up the computer work. But there is still a miss rounded number because we can only rounded nearly 55 milli secons (18 ticks/second). So there is a delay in the display time in orde a few seconds per day. After the programming end, everything is return as before (So it doesn't matter for a few minutes). At last I found the methode to get the exactly how to make the delay time without depends on the computer types (processor independent delay), see the references below for the detailed. The fixed hardware time delay was implemented in the IBM PC/AT and continued in all 286, 386, 486, and Pentium based IBM and compatibles computers. IBM made PB-4 of port 61H toggle every 15.085 uS (this maybe efresh time of DRAM). The routine is like this :


Delay_50_mS Proc    Near
          MOV       CX,3314         ;Count of 15.085 uS, about 50 mS delay
          PUSH      AX
Delay_1:  IN        AL,61H
          AND       AL,10H          ;Check PB-4
          CMP       AL,AH           ;Did it just change ?
          JE        Delay_1         ;Wait for change
          MOV       AH,AL           ;Save the new status
          LOOP      Delay_1         ;Continue until CX zero
          POP       AX
          RET
Delay_50_mS ENDP
So the program can be write in pure Pascal like below, and I compiled it using Turbo Pascal version 5.5. Here is the program looks like when in the programmed mode.
 
PROCEDURE Delay_50_mS;
BEGIN
     Regs.CX := 3314;               { Count of 15.085 uS, about 50 mS delay }
     REPEAT
           REPEAT
                 Regs.AL := PORT[$61];
                 Regs.AL := Regs.AL AND $10;    { Check PB-4 }
           UNTIL Regs.AL <> Regs.AH;            { Did it just change ? }
           Regs.AH := Regs.AL;                  { Save the new status }
           DEC(Regs.CX);
     UNTIL Regs.CX = 0;                         { Continue until CX zero }
END;
Bits used for this EPROM programmer are :
For PC bits :      PC-3           PC-2          PC-1          PC-0
                   (17)           (16)          (14)           (1)
Function :       Address       A12 EPROM        Reset      ____   ___
                 clock                         4040        PGM or CE
Reset 4040          0             0  1         1 0 1            0
Increment A12      0 1 0           0  1           1              0
Read EPROM          0             0  1           1            0 1 0
Stand by/Inhibit    0             0  1           1              0
Write EPROM         0             0  1           1            0 1 0
For PS bits :      PS-3          PS-4         PS-7
                   (15)          (13)         (11)
Function :       Identify       Select      Identify
Card check           0             X            1
EPROM read mode      0             0            1
Eprom write mode     0             1            1
Data send to the port for mode operation are :
Write mode operation :
    For Low Address A12 (A12 not active):  Stand-by:        Program:         Inc. Address:
    * Bi-directional port                  PC_Port:=$02;    PC_port:=$03;    PC_Port:=$0A;
    * Standard port                        DP_Port:=$49;    DP_Port:=$48;    DP_Port:=$41;
    For High Address A12 (A12 active):
    * Bi-directional port                  PC_Port:=$06;    PC_Port:=$07;    PC_Port:=$0E;
    * Standard port                        DP_Port:=$4D;    DP_Port:=$4C;    DP_Port:=$45;

Read mode operation :
    For Low Address A12 (A12 not active):  Stand-by:        Read:            Inc. Address:
    * Bi-directional port                  PC_Port:=$02;    PC_port:=$23;    PC_Port:=$0A;
    * Standard port                        DP_Port:=$C9;    DP_Port:=$C8;    DP_Port:=$C1;
    For High Address A12 (A12 active):
    * Bi-directional port                  PC_Port:=$06;    PC_Port:=$27;    PC_Port:=$0E;
    * Standard port                        DP_Port:=$CD;    DP_Port:=$CC;    DP_Port:=$C5;
Data file to be programmed have the extension as *.EDF (stand for EPROM Data File as default). This file may have another extension as you wish. Such as, if your data file was a compiled program or just only data. The file can also be build by used a simple EPROM editor. This program I create to make data for Fonts Generator program. But it may be used to input any other data or program in machine hex code.

With the read capability, we can make a compare option mode (verifying mode). But its rather compare then verify, since we couldnot do the step in a byte but in a whole process. For this purpose I make 2 buffer as one for input data buffer and another one for reading data buffer. After programming process has complete, reading mode must be perform first, and then comparing can be done. Part list for the EPROM Programmer :
  • Resistors :
    • R1 = 82 Ohm (1/2W)............................................................... 1 pce
    • R2...R7 = 4k7 (1/4W).............................................................. 6 pcs
  • Capacitors :
    • C1 = 470uF/25V...................................................................... 1 pce
  • Diodes :
    • D1...D5 = 1N4001................................................................... 5 pcs
    • LED1...LED2 = Red 3 mm......................................................... 2 pcs
  • Semiconductors :
    • IC1 = 7812............................................................................ 1 pce
    • IC2 = 7805............................................................................ 1 pce
    • IC3 = 4040............................................................................ 1 pce
  • Others :
    • Transformer Tr1=500mA/15V sec, 220V pri ................................ 1 pce
    • IC Socket for 28 pins or textool type.......................................... 1 pce
    • Selector Switch S1..S2 (dpdt).................................................... 2 pcs
    • Power-On Switch S3 (spst)....................................................... 1 pce
    • Cable (0.75sq X 16c)............................................................... 2 m
    • DB-25 Socket (male)............................................................... 1 pce

None of changes will be need if we connect the programmer card to the bi-directional port or standard LPT port, but you must be remember that to connect to the standard LPT port, it needs additional LPT extender card which must be configured so the pins compatible with the pin number of standard LPT port. Refer to the schematic diagram for more infos.
A Programmer's Introduction to C# 2.0 (Expert's Voice) 
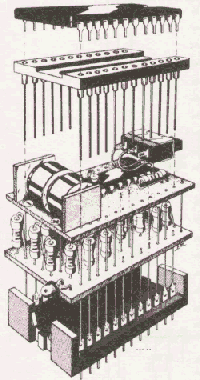
PCB mounting. As usual, I prefer to put the whole unit on a piece of board like showing below. It is easy to take some measurement point, and besides that more easy to insert or take out the EPROM by itself. For the EPROM socket, it is all your decision what type you might be want to use. It's very good if you can use one like textool type

I PROM

What is an IPROM?


IPROM is stand for Instantly Programmable Read Only Memory. The basic is to use a static RAM (Random Access Memory) with backup battery to replace the ROM purpose. Used a low power supply static RAM can hold the data until a year or more with 2 button batteries. And then, what for we use an IPROM to replace a conventional ROM? The data can not be changed in one or two byte in ROM. we must reprogramming all from the beginning, but in IPROM, even one byte can be changed. The fact also very indeed when we must make some test for a program under development. It is very hard and also tired to reprogramming the ROM times to times until the program run to the correct condition.
If we use an IPROM, we do not need an EPROM programmer or something like that, because the operation is to write like the standard RAM. In this circuit we use a RAM type HM6116LP (2k x 8 byte). It is enought for the small system computer. For the power, we can use one battery Ni-Cad like for CMOS backup or we can use 2 button cell batteries like LR-44 (in my proto-type, this type can hold data until a year). The construction need a quiet carefull to handel. The first, you must soldering all the componens to the PCB, and then assemble it one by one from the top to the bottom. Use a small one switch and a good type socket for the RAM IC's. For the complete circuit and construction, you can see the picture below:

click the below images for zooming 

 Fig.2. IPROM PCB.
Fig.1. IPROM Circuit.


EliteGroup P4M800PRO-M (1.0) - Motherboard - micro ATX - LGA775 Socket - P4M800 Pro - Ethernet - onboard graphics - 6-channel audio                       Biostar P4M80 Pro-M7C 2GB Memory Ram Kit (2x1GB) (A-Tech Brand)


Fig.3. IPROM Construction

Fig.4. IPROM View.
IPROM Part List :
  • Resistors :
    • R1 = 220 Ohm
    • R2 = 56 Ohm
    • R3 = 1 kOhm
    • R4 = 4.7 kOhm
    • R5 = 2.2 kOhm (place when used a Ni-Cad battery for charging)
    • R6 ... R26 = 47 kOhm
    All resistors are 1/8 Watt type
  • Capasitors :
    • C1 = 4.7uF/16V (tantalum type)
    • C2 = 10 nF (ceramic type)
  • Semiconductors :
    • D1 = Red LED
    • D2, D3 = DUG (eg. 1N60, etc.)
    • T1 = BC 547 B
    • IC1 = HM 6116 LP
    • IC2 = 4071 B
  • Others :
    • IC socket 24 pins = 2 pcs
    • S1 = togle 1 pole
    • 2 button cell battery or 1 Ni-Cad battery
When I create my PC program, I had to built the interface for the IPROM to run in my PC/XT. The circuit used an I/O address $E100:$0000 throught $E100:$0FFF for two IPROMs (you must canged it if you want to use it in the PC/AT computer, because that address has been used by the system ROM). The design is not quiet good because in that time it is very hard to find the two layer PCB and if can the value is to high, so I used it by combine the 2 type of PCBs. I used the ORCAD program and Smartwork to design the schematic and layout. For the slot, I used a two layer PCB, and for the IPROMs, I used a one layer PCB. The complete interface circuit is like below :

click the below images for zooming


ECS Elitegroup Computer P4M800PRO-M2 (V2.0) 1GB Memory Ram Upgrade (A-Tech Brand)ECS Elitegroup Computer P4M800PRO-M2 (V2.0) 512MB Memory Ram Upgrade (A-Tech Brand)


 Interface Part List :
  • Resistors :
    • R1 ... R4 = 220 Ohm
  • Semiconductors :
    • IC1 = 74LS07
    • IC2 = 74LS05
    • IC3 = 74LS32
    • IC4 ... IC5 = IPROM
    • IC6 = 74LS245
  • Capacitor :
    • C1, C2 = 100nF
  • Other :
    • IC socket 24 pins = 2 pcs

SOUND CARD TRICK


Many computers in earlier version like 8086, 80286, 80386 and even 80486 don't have a sound card. How does if someone want to play programs that need a sound card like a game program to these computers? Here are a very cheap sound card designed by Tomi Engdahl that I found on the elsewhere in the net. There are two types of design. First, it used a simple ladder resistors to made a Digital to Analog Converter. Find the nearest value resistors with tolerance 1% or less. Second, it used an extra IC. Both design are to make an 8 bit sound card. The ouput can be connect to your sound system to tape decks amplifier or input to radio's amplifier.
Creative Labs SB0570L4 Sound Blaster Audigy SE Sound CardExternal 5.1 USB 3D Audio Sound Card Adapter for PC Desktop Notebook Laptop


Alpine Hearing Protection MusicSafe Classic Earplugs for MusiciansDazzle DVD Recorder Plus
These sound cards use a software driver used for Covox Speech Thing. You can download the driver from Tomi site or from here and installed it at the windows/system directory. This driver is for windows 3.1x design, but you can try it to windows 95. The sound is very good ... enjoy it.


Because this card used the same data line with printer, so when you do some printing job, irrating sounds will be heard from this sound card. This is not make any damage to your card or printer.

Labels

PROJECTS 8086 PIN CONFIGURATION 80X86 PROCESSORS TRANSDUCERS 8086 – ARCHITECTURE Hall-Effect Transducers INTEL 8085 OPTICAL MATERIALS BIPOLAR TRANSISTORS INTEL 8255 Optoelectronic Devices Thermistors thevenin's theorem MAXIMUM MODE CONFIGURATION OF 8086 SYSTEM ASSEMBLY LANGUAGE PROGRAMME OF 80X86 PROCESSORS POWER PLANT ENGINEERING PRIME MOVERS 8279 with 8085 MINIMUM MODE CONFIGURATION OF 8086 SYSTEM MISCELLANEOUS DEVICES MODERN ENGINEERING MATERIALS 8085 Processor- Q and A-1 BASIC CONCEPTS OF FLUID MECHANICS OSCILLATORS 8085 Processor- Q and A-2 Features of 8086 PUMPS AND TURBINES 8031/8051 MICROCONTROLLER Chemfet Transducers DIODES FIRST LAW OF THERMODYNAMICS METHOD OF STATEMENTS 8279 with 8086 HIGH VOLTAGE ENGINEERING OVERVOLATGES AND INSULATION COORDINATION Thermocouples 8251A to 8086 ARCHITECTURE OF 8031/8051 Angle-Beam Transducers DATA TRANSFER INSTRUCTIONS IN 8051/8031 INSTRUCTION SET FOR 8051/8031 INTEL 8279 KEYBOARD AND DISPLAY INTERFACES USING 8279 LOGICAL INSTRUCTIONS FOR 8051/8031 Photonic Transducers TECHNOLOGICAL TIPS THREE POINT STARTER 8257 with 8085 ARITHMETIC INSTRUCTIONS IN 8051/8031 LIGHTNING PHENOMENA Photoelectric Detectors Physical Strain Gage Transducers 8259 PROCESSOR APPLICATIONS OF HALL EFFECT BRANCHING INSTRUCTIONS FOR 8051/8031 CPU OF 8031/8051 Capacitive Transducers DECODER Electromagnetic Transducer Hall voltage INTEL 8051 MICROCONTROLLER INTEL 8251A Insulation Resistance Test PINS AND SIGNALS OF 8031/8051 Physical Transducers Resistive Transducer STARTERS Thermocouple Vacuum Gages USART-INTEL 8251A APPLICATIONs OF 8085 MICROPROCESSOR CAPACITANCE Data Transfer Instructions In 8086 Processors EARTH FAULT RELAY ELECTRIC MOTORS ELECTRICAL AND ELECTRONIC INSTRUMENTS ELECTRICAL BREAKDOWN IN GASES FIELD EFFECT TRANSISTOR (FET) INTEL 8257 IONIZATION AND DECAY PROCESSES Inductive Transducers Microprocessor and Microcontroller OVER CURRENT RELAY OVER CURRENT RELAY TESTING METHODS PhotoConductive Detectors PhotoVoltaic Detectors Registers Of 8051/8031 Microcontroller Testing Methods ADC INTERFACE AMPLIFIERS APPLICATIONS OF 8259 EARTH ELECTRODE RESISTANCE MEASUREMENT TESTING METHODS EARTH FAULT RELAY TESTING METHODS Electricity Ferrodynamic Wattmeter Fiber-Optic Transducers IC TESTER IC TESTER part-2 INTERRUPTS Intravascular imaging transducer LIGHTNING ARRESTERS MEASUREMENT SYSTEM Mechanical imaging transducers Mesh Current-2 Millman's Theorem NEGATIVE FEEDBACK Norton's Polarity Test Potentiometric transducers Ratio Test SERIAL DATA COMMUNICATION SFR OF 8051/8031 SOLIDS AND LIQUIDS Speed Control System 8085 Stepper Motor Control System Winding Resistance Test 20 MVA 6-digits 6-digits 7-segment LEDs 7-segment A-to-D A/D ADC ADVANTAGES OF CORONA ALTERNATOR BY POTIER & ASA METHOD ANALOG TO DIGITAL CONVERTER AUXILIARY TRANSFORMER AUXILIARY TRANSFORMER TESTING AUXILIARY TRANSFORMER TESTING METHODS Analog Devices A–D BERNOULLI’S PRINCIPLE BUS BAR BUS BAR TESTING Basic measuring circuits Bernoulli's Equation Bit Manipulation Instruction Buchholz relay test CORONA POWER LOSS CURRENT TRANSFORMER CURRENT TRANSFORMER TESTING Contact resistance test Current to voltage converter DAC INTERFACE DESCRIBE MULTIPLY-EXCITED Digital Storage Oscilloscope Display Driver Circuit E PROMER ELPLUS NT-111 EPROM AND STATIC RAM EXCITED MAGNETIC FIELD Electrical Machines II- Exp NO.1 Energy Meters FACTORS AFFECTING CORONA FLIP FLOPS Fluid Dynamics and Bernoulli's Equation Fluorescence Chemical Transducers Foil Strain Gages HALL EFFECT HIGH VOLTAGE ENGG HV test HYSTERESIS MOTOR Hall co-efficient Hall voltage and Hall Co-efficient High Voltage Insulator Coating Hot-wire anemometer How to Read a Capacitor? IC TESTER part-1 INSTRUMENT TRANSFORMERS Importance of Hall Effect Insulation resistance check Insulator Coating Knee point Test LEDs LEDs Display Driver LEDs Display Driver Circuit LM35 LOGIC CONTROLLER LPT LPT PORT LPT PORT EXPANDER LPT PORT LPT PORT EXTENDER Life Gone? MAGNETIC FIELD MAGNETIC FIELD SYSTEMS METHOD OF STATEMENT FOR TRANSFORMER STABILITY TEST METHODS OF REDUCING CORONA EFFECT MULTIPLY-EXCITED MULTIPLY-EXCITED MAGNETIC FIELD SYSTEMS Mesh Current Mesh Current-1 Moving Iron Instruments Multiplexing Network Theorems Node Voltage Method On-No Load And On Load Condition PLC PORT EXTENDER POTIER & ASA METHOD POWER TRANSFORMER POWER TRANSFORMER TESTING POWER TRANSFORMER TESTING METHODS PROGRAMMABLE LOGIC PROGRAMMABLE LOGIC CONTROLLER Parallel Port EXPANDER Paschen's law Piezoelectric Wave-Propagation Transducers Potential Transformer RADIO INTERFERENCE RECTIFIERS REGULATION OF ALTERNATOR REGULATION OF THREE PHASE ALTERNATOR Read a Capacitor SINGLY-EXCITED SOLIDS AND LIQUIDS Classical gas laws Secondary effects Semiconductor strain gages Speaker Driver Strain Gages Streamer theory Superposition Superposition theorem Swinburne’s Test TMOD TRANSFORMER TESTING METHODS Tape Recorder Three-Phase Wattmeter Transformer Tap Changer Transformer Testing Vector group test Virus Activity Voltage Insulator Coating Voltage To Frequency Converter Voltage to current converter What is analog-to-digital conversion Windows work for Nokia capacitor labels excitation current test magnetic balance voltage to frequency converter wiki electronic frequency converter testing voltage with a multimeter 50 hz voltages voltmeter

Search More Posts

Followers